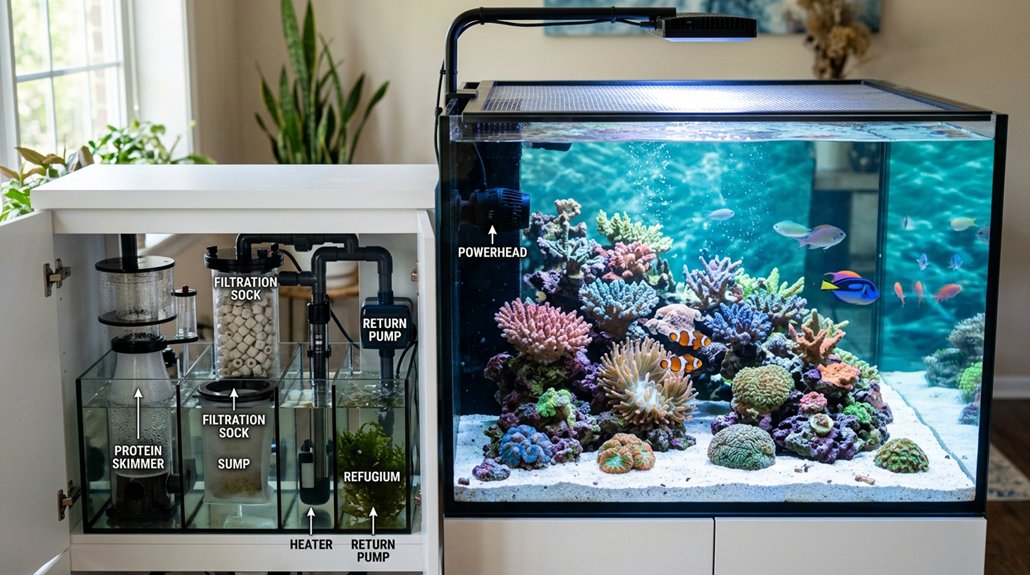
Start by choosing a tank that fits your livestock, with 30–40 gallons as a practical beginner FOWLR minimum and 55–75+ gallons better for reefs. Place it on a level, GFCI-protected site with floor support, then install a sump, skimmer, and redundant heaters and pumps. Add rinsed rock and sand, mix 1.025 salinity saltwater, cycle with strong flow, and test ammonia, nitrite, alkalinity, and phosphate until stable before stocking. More details can help you avoid costly mistakes.
Key Takeaways
- Choose a permanent location, confirm floor support, and provide GFCI-protected power with drip loops and access behind the stand.
- Select an appropriately sized tank and stand; beginners usually start with 30–40 gallons for FOWLR or 55–75+ gallons for reefs.
- Install sump, plumbing, skimmer, heaters, and circulation pumps with redundancy, unions, valves, and backup overflow protection.
- Add rinsed sand and cured live rock securely, then fill with 1.025 specific gravity saltwater mixed with RO/DI water.
- Cycle the tank with flow and filtration running, then test ammonia, nitrite, nitrate, alkalinity, phosphate, and temperature before stocking.
Pick the Best Tank Size
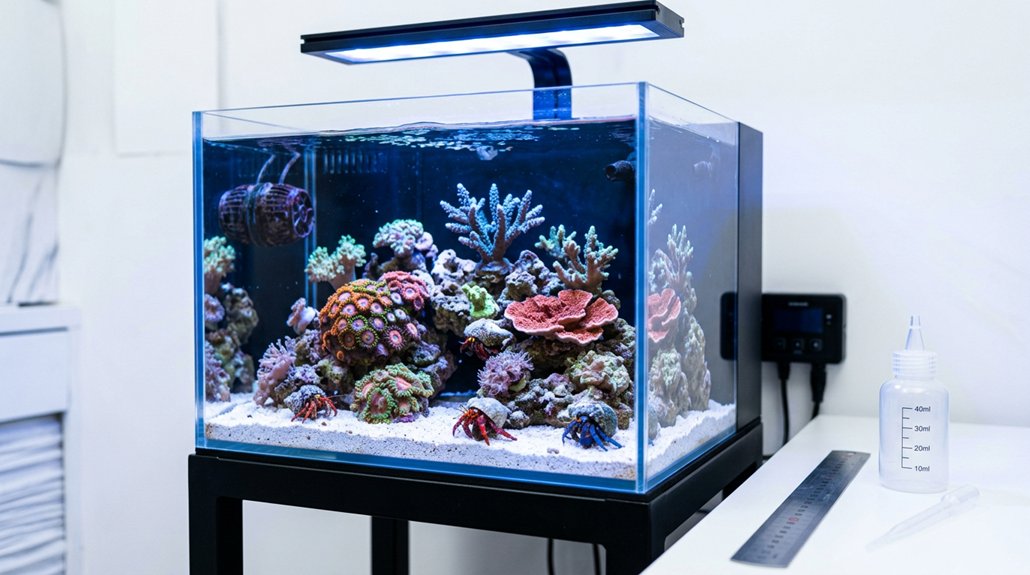
If you’re planning a saltwater aquarium, start by matching tank size to your livestock goals and maintenance tolerance: a 30–40 gallon system is a practical minimum for a stable beginner FOWLR setup, while 55–75+ gallons is a better choice for mixed reefs because the larger water volume buffers salinity, temperature, and nutrient swings. Avoid nanos under 20–30 gallons if you want reef flexibility; they’re cheaper, but chemistry shifts fast and livestock options shrink. Use roughly 1 lb of live rock per gallon, and account for sump volume plus equipment footprint when you judge total space. A tank’s ideal footprint should support access, filtration, and future proofing capacity. If you’re aiming for SPS or LPS corals, choose the larger system; it’s more stable and less likely to force an early upgrade.
Plan the Tank Location First
Choose the tank’s permanent location before you buy, and verify the floor can support the full system weight—about 825 lb for a filled 75-gallon tank—without relying on an unsupported mid-floor position. Keep it out of direct sunlight and high-traffic areas, and make sure you’ve got access on all sides for maintenance, cord routing, and safe equipment placement. If you can, locate the sump and noisy hardware near a utility space, then plan GFCI-protected power, dedicated circuits, and service clearance from the start.
Choose Tank Placement
Before you set up the tank, map out its final location carefully, since placement affects livestock health, maintenance access, electrical safety, and structural support. Keep it out of direct natural light and away from high-traffic furniture proximity to reduce algae, stress, and bump risk. A filled 75-gallon system can weigh 750-900 lbs, so choose a level, non-sagging floor and confirm support if needed.
| Factor | Target | Why |
|---|---|---|
| Clearance | 12-18 in. | Plumbing and cleaning |
| Power | GFCI outlet | Shock protection |
| Equipment | Nearby room | Lower noise |
Plan short plumbing runs to the sump, but leave service space behind and beside the stand. Route cords for easy access, and avoid splashes. Pick a spot you can keep for years, considering nearby candles, air fresheners, and pets.
Check Space And Safety
Once you’ve identified a possible location, verify that the floor can safely support the full system weight and that the area offers both front and rear access for maintenance; a 46-gallon setup can total roughly 440–550 lb with water, tank, and stand, and anything over about 300–400 lb on questionable framing may warrant a structural inspection or a different location. Perform a floor inspection before filling, and use sunlight avoidance to keep the tank away from windows and exterior walls, reducing algae and temperature swings. Leave 12–18 inches behind the stand for plumbing, ventilation, and sump access. Use a GFCI-protected circuit, raise power strips above spill height, and route cables with Velcro ties. Keep chemicals, aerosols, and candles well away, and secure heaters and controllers.
Set Up the Stand and Sump
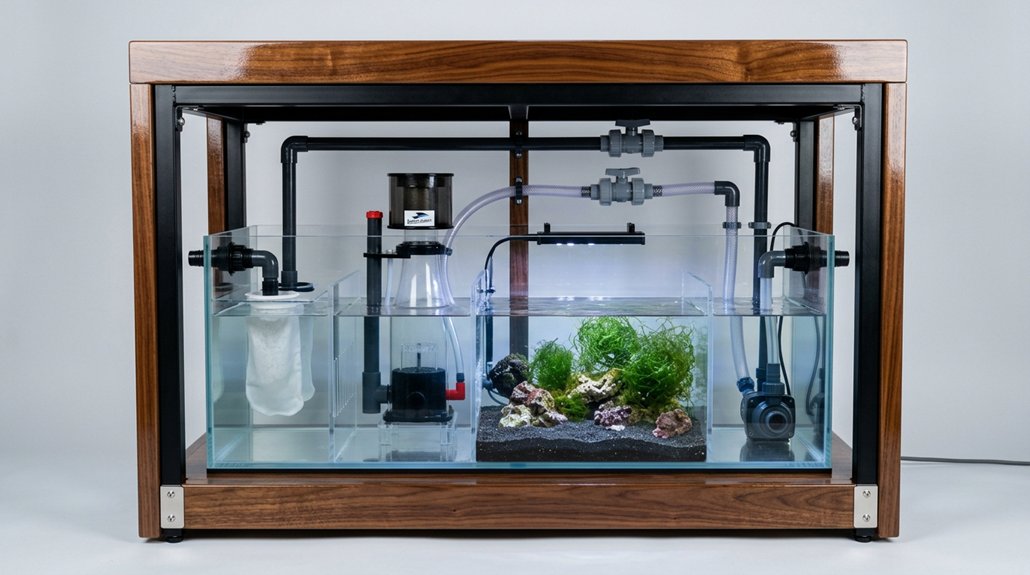
You’ll want to place the stand on a level, load-rated surface that can safely support the filled aquarium’s total weight, with the stand verified against manufacturer specs or a structural review for larger systems. Layout the sump so it fits the cabinet footprint with enough clearance for the pump, skimmer, plumbing, and a 20–50% sump volume, while keeping a hinged or removable panel for service access. Route the return line as short and straight as possible, add a flow-control valve and backflow prevention, and organize cords and pumps with vibration isolation, drip loops, and GFCI-protected power.
Stand Placement
Set the stand on a level, load-bearing floor area away from direct sunlight and high-traffic zones, and for larger systems—especially tanks 75 gallons and up—verify joist capacity or add structural reinforcement before filling. Make certain the stand footprint matches your sump and leaves 6–12 inches of clearance for plumbing, cables, and cleaning access. Place it near a GFCI-protected outlet or dedicated breaker, and keep equipment elevated against splashes. For noise isolation, consider a basement or separate room for the sump and return equipment.
- Confirm floor reinforcement
- Maintain clearance around plumbing
- Protect electrical components
- Reduce operating noise
Position the system so maintenance stays efficient, and don’t block access to valves, cords, or filters.
Sump Layout
Position the sump directly beneath the display tank, or in a nearby cabinet with a straight drain-and-return path whenever possible, to reduce plumbing complexity, noise, and priming problems. Size it for 10–20% of display volume, leaving extra capacity for skimmer body, return pump, and water-level fluctuations. Lay out chambers front to back: inlet with filter socks, a skimmer/refugium zone with 6–12 inches of clearance, and a return chamber with a stable level and emergency drain. Use unions, ball valves, and a gate valve for service and flow tuning. Choose a beehive, Durso, or siphon drain with backup overflow. Thoughtful sump aesthetics improve access, cable management, and noise mitigation. Mount heaters, controller, and a DC return pump if possible.
Choose the Right Reef Equipment
Dial in reef equipment around the biology you plan to keep: lighting should match coral demand and PAR targets, with roughly 100–300 PAR for LPS, 200–450 PAR for mixed reefs, and 300–600+ PAR for SPS, using LEDs or VHO/metal halide equivalents that evenly cover the tank footprint. Your lighting selection should prioritize spectrum control and spread.
Dial in reef lighting to your coral mix, targeting the right PAR and even spread across the tank.
- Size the return pump and controllable powerheads for about 10× plus 10–40× turnover.
- Choose an oversized protein skimmer, rated at least twice tank volume, with sump clearance.
- Install RO/DI filtration and verify 1.025 specific gravity with a refractometer.
- Build in equipment redundancy: two heaters, a temperature controller, and DC pumps.
Use an aquarium controller if you want alarms, timers, and fail-safe automation.
Plan Saltwater Aquarium Flow
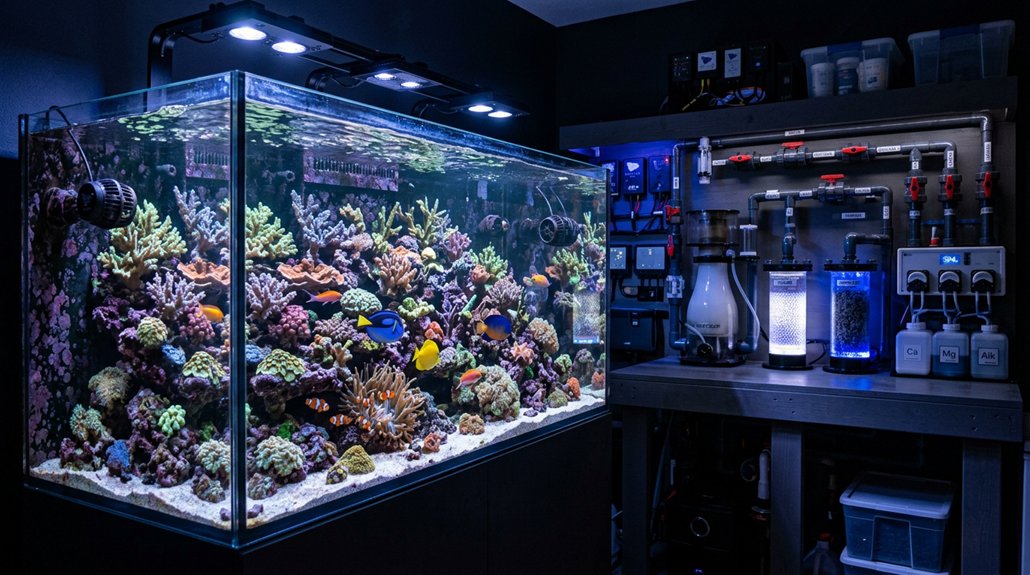
Plan your saltwater aquarium flow around the livestock you want to keep, targeting total system turnover of roughly 10–50× tank volume, with many reef tanks performing well near 20×; for example, a 46-gallon system would need about 920 gph combined from the return pump and powerheads. Size the return pump for plumbing head loss, not the box rating, and select a model about 20–30% above calculated demand if needed. Add multiple controllable powerheads to create randomized circulation, eliminate dead spots, and vary velocity across the tank. Aim for gentler flow near the substrate and stronger, changing currents near coral zones. Build in flow redundancy with at least two running pumps, so circulation and oxygenation continue if one fails. Minimize restrictive fittings, sharp bends, and undersized pipe.
Add Rock and Sand the Smart Way
Set your rock and sand before filling the tank, because the aquascape determines both stability and water movement. Rinse dry sand in prepared saltwater, then add about 8 lbs per sq ft per inch depth; keep it near 1″ unless you’re intentionally avoiding anaerobic zones with a deep bed.
- Place porous rock gently on the substrate.
- Build arches and caves with strong support.
- Aim for about 1 lb rock per gallon.
- Leave channels so powerheads reach every crevice.
If you’re using live rock, rinse it briefly, inspect for hitchhikers, and cure it under strong flow with a skimmer for 3–4 weeks. Remove loose detritus during water changes. Avoid decorative sandscaping that traps debris or creates unstable overhangs.
Mix Saltwater and Start Cycling
Mixing saltwater correctly is the next critical step: use an RODI unit to produce pure freshwater, then add marine salt to the manufacturer’s recommended ratio until you reach a target specific gravity of 1.025 (±0.001), verified with a refractometer. In your water mixing bucket, keep an airstone or powerhead running until every crystal dissolves, then heat the batch to match tank temperature within ±1°C before transfer. Once the aquarium’s filled, begin the cycling timeline by adding cured live rock or an ammonia source, and keep continuous flow and filtration on. Maintain pH 8.1–8.4 and stable temperature at 24–26°C. Test ammonia and nitrite at least twice weekly. If odors or organics build up, perform 20–50% water changes. Continue until both read zero and nitrates appear, then change 25% before stocking.
Test Water Parameters Regularly
Regularly testing your water is the best way to catch stability problems before they affect livestock: during the first six months, check alkalinity (dKH), nitrate (NO3), and phosphate (PO4) at least twice weekly, aiming for about 8–9 dKH, NO3 below 5 ppm in reef systems, and PO4 below 0.03 ppm. Use reliable liquid kits or probes, not strips, and verify salinity with a refractometer at 1.024–1.026 specific gravity.
Test alkalinity, nitrate, phosphate, and salinity regularly to catch water instability before it harms livestock.
- Test ammonia and nitrite while cycling
- Keep both at zero before sensitive animals
- Log date, time, values, and dosing
- Perform equipment calibration and replace reagents regularly
Track trends, not isolated numbers. If readings swing sharply, correct immediately with partial water changes or dosing adjustments. Consistent water testing and disciplined equipment calibration help you maintain chemical stability and avoid preventable losses.
Add a Cleanup Crew, Then Fish
After your tank has fully cycled and live rock and sand have cured, add a small cleanup crew in staged groups—such as Nassarius or Cerith snails, Turbo or Trochus snails, and a few small hermits—to minimize ammonia and nitrite shock. Match species to the substrate and algae load, and avoid overcrowding so each invertebrate has enough detritus or algal growth to sustain it. Once the crew is stable for at least 2 weeks and water tests remain steady, you can introduce your first fish gradually while continuing to monitor nutrient levels and grazing activity.
Cleanup Crew Timing
Once the tank has finished cycling and the live rock is curing, add a basic cleanup crew right away so it can start grazing on diatoms and early microalgae before they spread; a practical starting point is about 2–5 snails and 1–2 hermit crabs per 10–20 gallons. During initial acclimation, match salinity slowly so grazing behavior stays stable.
- Wait 2 weeks before fish.
- Choose species for tank size.
- Add macroalgae or feedings if needed.
- Expand in 2–5 animal batches.
Use Nassarius or Cerith snails for sand and Turbo snails for glass in tanks 20+ gallons. Watch for declining populations, which can signal insufficient nutrition. Add more only as bioload and parameters remain stable, avoiding overstocking and sudden stress.
Fish Addition Plan
With the cleanup crew already established, you can begin adding fish only after the tank has fully cycled and key parameters are stable, since inverts will help manage algae and detritus before you increase bioload. Quarantine all new fish and inverts in a separate QT tank for 2–4 weeks, then use drip acclimation before release. Start with hardy, low-bioload species: in a 46-gal bowfront, add 1–2 Ocellaris clownfish, then a Six-line wrasse or Fridmani pseudochromis, then a small school of 4–6 Green Chromis or Kaudern’s cardinals. Add only 1–2 animals at a time, waiting two weeks between additions. After each stocking event, test ammonia, nitrite, nitrate, pH, and temperature daily for a week, and perform a 25% water change if needed. Keep a strict feeding schedule: small portions twice daily, consumed within minutes.
Add Corals After the Tank Stabilizes
When your saltwater tank has stabilized for at least 6–8 weeks—meaning ammonia and nitrite are consistently zero and alkalinity and calcium are holding steady—you can begin adding corals. Perform a 25% water change, verify specific gravity near 1.025, and confirm temperature via dual-heater redundancy. Start with hardy soft corals and mushrooms, then avoid SPS/LPS until chemistry is reliable. Use slow acclimation techniques: drip corals for 30–60 minutes, then place them in low-flow, low-light zones for 1–2 weeks. Maintain coral quarantine for new specimens to screen pests and disease.
- Zoanthids, Ricordea, toadstools
- Test alkalinity, calcium, nitrate, phosphate twice weekly
- Add only small batches every 2 weeks
- Watch for bleaching, slime, hitchhikers
Frequently Asked Questions
How Often Should I Top off Evaporated Saltwater?
You should top off evaporated saltwater daily, or whenever water level drops, because evaporation raises salinity. Use salinity monitoring to keep specific gravity stable, and replace only freshwater, not saltwater, to maintain balance.
When Should I Change Filter Socks or Mechanical Media?
You should change filter socks or mechanical media when you notice reduced flow, visible silt buildup, or after 2–4 days. You’ll prevent detritus breakdown, maintain flow patterns, and keep nutrients from spiking.
Do I Need a Protein Skimmer for a Nano Reef?
You don’t need a protein skimmer for every nano reef, but it helps with nutrient control. If you choose nano filtration alternatives, you’ll need tighter maintenance, water changes, and careful feeding to avoid buildup.
How Long Should I Acclimate New Saltwater Livestock?
You should acclimate new saltwater livestock 30–90 minutes, using gradual dripdown while salinity matching your tank; watch temperature, pH, and behavior closely, and don’t extend it excessively, which can stress delicate marine animals.
What Signs Show My Tank Is Fully Cycled?
You’re fully cycled when ammonia and nitrite read zero for several days after a feeding or ghost load, no ammonia spikes or nitrite peak occur, and nitrate is measurable while livestock stays stable.
Conclusion
By following these steps, you set yourself up for a reef tank that runs smoothly instead of fighting you at every turn. When your tank size, equipment, flow, and cycling all line up, you create the stable conditions saltwater life needs. Then, almost by coincidence, the cleanup crew starts working, fish settle in, and corals begin to thrive. Keep testing, stay patient, and you’ll see your aquarium reward you with balance and growth.